- Published on
React bootstrap table - Part 1
- Authors

- Name
- Vimalraj Selvam
- @email2vimalraj
Sometime back I came across a library called React Bootstrap Table. This helps you to build the table with loads of features like Pagination, Filtering, Sorting, Export to CSV and many more. And even it allows you to customise as per your need. I've explored various grid / table component libraries to use, but many came with difficulty to either learning or implementing or lack of expected feature. So I've got settled with this library and moreover it is actively maintained.
What am I going to show?
- Basic table with data fetched from remote with pagination - Part 1
- Adding some filters - Part 2
- Customising few fields based on our needs - Part 3
What not?
- I'm not going to show you how to write react app with redux. I assume that you should know react and redux already. If not, kindly head to this tutorial written by Cory House. Because the sample app created follows exactly the same structure what he taught in that tutorial.
Demo
You can download the sample from here. This has the instructions on how to setup and run the demo.
Mock Data
Before writing our component, we need some data to populate our table. I used Mockaroo to generate the mock data. The mock data contains id, productName, price, manufacturedDate, expiryDate elements with 100 rows. I would like to show 10 rows in table with 10 paginated links. This way at any point of time, user's browser will only have 10 rows of data. For every pagination navigation, there will be a fetch call triggered.
Mock Api
To ease certain things, I use mock api instead of real api, which will return the data when queried. Create a file called mockApi.js in src/api/mockApi.js.
import _ from 'underscore'

// Mock data generated from https://www.mockaroo.com/
const mockData = [
  {
    id: 1,
    productName: 'pain reliever',
    price: 14,
    manufacturedDate: '2016-08-01',
    expiryDate: '2016-07-11',
  },
  {
    id: 2,
    productName: 'Dorzolamide Hydrochloride and Timolol Maleate',
    price: 100,
    manufacturedDate: '2015-12-30',
    expiryDate: '2016-05-29',
  },
]

class ProductApi {
  // Get the products by page number
  static getProducts(page) {
    return new Promise((resolve, reject) => {
      // Just to simulate a delay
      setTimeout(() => {
        let products = {}
        products.pageCount = 10
        products.resultsCount = 100
        products.productList = _.first(_.rest(mockData, page * 10 - 10), 10) // Divides the 100 data by chunks of 10
        resolve(Object.assign({}, products))
      }, 100)
    })
  }
}

export default ProductApi
The getProducts method will be triggered by the redux action to fetch the data. Refer src/actions/productActions.js on how to trigger from action. We also need the data populated on the table once the page is landed. Refer src/index.js on how we dispatch an action. Using the redux reducer, we stored the data into the state called products. Let's create our component.
Components
For this tutorial, I'm going to create 2 components:
- HomePage - A container component
- ProductList - A presentational component
Let's build our presentational component first.
ProductList
Create ProductList.js in src/components/home/ProductList.js and paste the following code:
import React, { PropTypes } from 'react';
import { BootstrapTable, TableHeaderColumn } from 'react-bootstrap-table';

/**
A product list component which shows the table with list of data
**/
const ProductList = ({
  products,
  activePage,
  onNavigatePage
}) => {
  const productList = products.productList;

  const options = {
    hideSizePerPage: true,
    page: activePage,
    onPageChange: onNavigatePage
  };

  return(
    <bootstraptable data="{productList}" fetchinfo="{{dataTotalSize:" products.resultscount}}="" options="{options}" remote="" hover="" pagination=""><tableheadercolumn iskey="" datafield="id">Id</tableheadercolumn>
      <tableheadercolumn datafield="productName">Product</tableheadercolumn>
      <tableheadercolumn datafield="price">Price</tableheadercolumn>
      <tableheadercolumn datafield="manufacturedDate">Manufacture Date</tableheadercolumn>
      <tableheadercolumn datafield="expiryDate">Expiry Date</tableheadercolumn></bootstraptable>
  );
};

ProductList.propTypes = {
  products: PropTypes.object.isRequired,
  activePage: PropTypes.number.isRequired,
  onNavigatePage: PropTypes.func.isRequired
};

export default ProductList;
We start with importing BootstrapTable and TableHeaderColumn from react-bootstrap-table library. Then we initialize our ProductList presentational component with three properties:
products- an object which we get from our mock apiactivePage- the current page numberonNavigatePage- a function which will call our action (remember the action calls the mockApi) to update the data and updates the active page
In the return, we initiate the BootstrapTable component with the required parameters which will be passed to our container component to render. Few things to note here:
data- takes the list of items to render in the table. In our case we are passing 10 items of product listfetchInfo- in which we specify how much data we have, based on that the number of pages will be calculated. In our case, we are saying 100 rows, so the library will divide 100 by 10 by default and show 10 pages in the pagination links.options- this is where we say what is our current page, what should happen if we navigate to another page and so on.remote- when it is true, the library ensures the data is coming from external source. In our case, it is coming frommockApi.
Next thing, for each field we create a TableHeaderColumn by saying my id column is the unique using isKey attribute.
Let's create our container component.
HomePage
Create HomePage.js in src/components/home/HomePage.js and paste the following there:
import React, { PropTypes } from 'react'
import { connect } from 'react-redux'
import { bindActionCreators } from 'redux'
import * as productActions from '../../actions/productActions'
import ProductList from './ProductList'

class HomePage extends React.Component {
  constructor(props, context) {
    super(props, context)
    this.state = {
      activePage: 1,
    }
    this.onNavigatePage = this.onNavigatePage.bind(this)
  }

  // This calls the loadAllProducts action and
  // also updates the activePage state to the navigated page number
  onNavigatePage(page, sizePerPage) {
    this.props.actions.loadAllProducts(page)
    this.setState({ activePage: page })
  }

  render() {
    const { products } = this.props
    return (
      Object.keys(products).length > 0 && (
        <ProductList
          products={products}
          activePage={this.state.activePage}
          onNavigatePage={this.onNavigatePage}
        />
      )
    )
  }
}

HomePage.propTypes = {
  products: PropTypes.object.isRequired,
  actions: PropTypes.object.isRequired,
}

function mapStateToProps(state, ownProps) {
  return {
    products: state.products,
  }
}

function mapDispatchToProps(dispatch) {
  return {
    actions: bindActionCreators(productActions, dispatch),
  }
}

export default connect(mapStateToProps, mapDispatchToProps)(HomePage)
Direct jump to render method. The render method simply initiates a ProductList component with the required properties which we have explained earlier.
The onNavigatePage method is implemented here which takes care of calling the action for the required page and udpates the activePage state so that the pagination control set the current page as active. That's it.
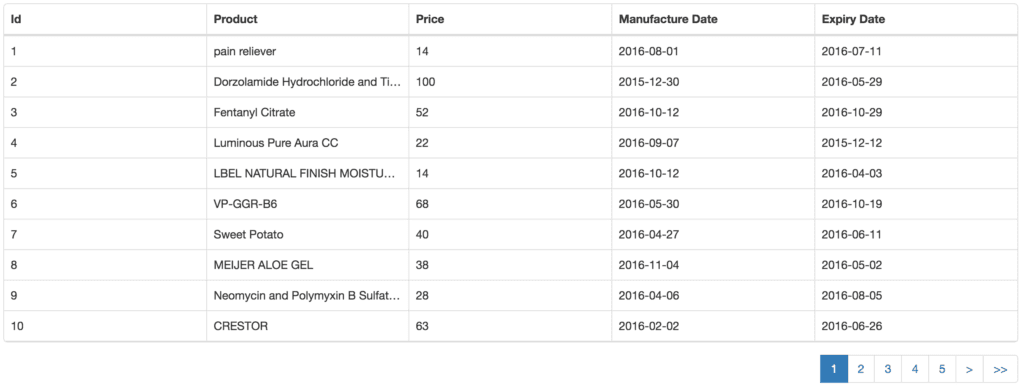
Now if you run npm start -s, and head to browser where it opened http://localhost:3005 you could see the table with pagination as like this:
We'll again meet soon with the Part-2.