Appium Parallel Execution using TestNG
This is the follow-up post on the Selenium Grid for Appium mobile automation.
Continuing from the example, I hope you have grid hub running with two various appium nodes which has unique applicationName.
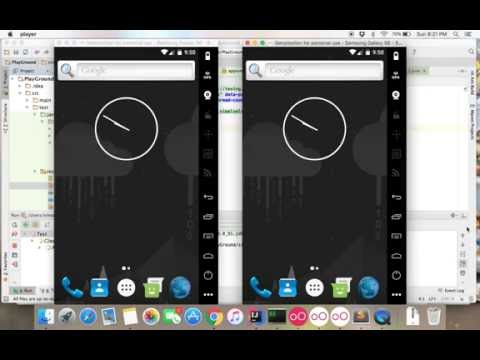
This post will focus on showing you on how we execute same tests across multiple devices in parallel. Because, often as test engineers, we have to sign-off our tests in various mobile platforms and devices. Let’s get into action.
Create a TestNG class as follows:
package com.vimalselvam.appium;

import io.appium.java_client.MobileBy;
import io.appium.java_client.android.AndroidDriver;
import io.appium.java_client.remote.MobileCapabilityType;
import org.openqa.selenium.remote.DesiredCapabilities;
import org.testng.annotations.*;

import java.net.MalformedURLException;
import java.net.URL;

public class AppiumTest {

 private AndroidDriver driver;
 private String applicationName;

 @Factory(dataProvider = "parallelDp")
 public AppiumTest(String applicationName) {
   this.applicationName = applicationName;
 }

 @DataProvider(name = "parallelDp")
 public static Object[][] parallelDp() {
   return new Object[][] {
     {"Samsung S4"},
     {"Samsung S5"}
   };
 }

 @BeforeClass
 public void setup() throws MalformedURLException {
   DesiredCapabilities desiredCapabilities = new DesiredCapabilities();
   desiredCapabilities.setCapability(MobileCapabilityType.DEVICE_NAME, "ANDROID");
   desiredCapabilities.setCapability(MobileCapabilityType.PLATFORM_NAME, "ANDROID");
   desiredCapabilities.setCapability("applicationName", this.applicationName);
   desiredCapabilities.setCapability(MobileCapabilityType.APP, "https://github.com/appium/java-client/raw/master/src/test/java/io/appium/java_client/ApiDemos-debug.apk");
   driver = new AndroidDriver(new URL("http://127.0.0.1:4444/wd/hub"), desiredCapabilities);
 }

 @Test
 public void launchTest() throws InterruptedException {
   System.err.println("Thread id: " + Thread.currentThread().getId());
   Thread.sleep(10000);
 }

 @Test(dependsOnMethods = {"launchTest"})
 public void clickTest() {
   driver.findElementById("android:id/content")
   .findElement(MobileBy.AccessibilityId("Graphics")).click();
 }

 @AfterClass
 public void teardown() {
   if (driver != null) {
     driver.quit();
   }
 }
}
Note here, I’ve created a @Factory constructor with the data provider called parallelDp. Refer here for more about @Factory. The data provider method produces two String objects of the applicationName which are the same as that I had created during my appium node configuration. Make sure the applicationName here are matches with your node configurations.
I am sure you don’t want me to explain the rest of the test code which simply explains by itself. Let’s move on.
Now create your TestNG Suite xml file as follows:
<!DOCTYPE suite SYSTEM "http://testng.org/testng-1.0.dtd">
<suite name="Test" verbose="1" data-provider-thread-count="2" thread-count="2" parallel="classes">
  <test name="TestClass" thread-count="2" parallel="instances">
    <classes>
      <class name="com.vimalselvam.appium.AppiumTest" />
    </classes>
  </test>
</suite>
I’ve set the suite parallel attribute as classes, so that it will create two instances of my test class in parallel as specified in my thread-count. That’s it, execute and see the magic in the below video.